Resizing and Rotation
Clik gives you precise control over the size and rotation of every element in your video. Whether you're cropping in on important details, creating picture-in-picture effects, or fixing footage shot at the wrong angle, the resizing and rotation tools help you frame your shots perfectly.
Accessing Size and Rotation Controls
Select any clip on your timeline or canvas to open the Inspector panel. The Inspector shows all the properties you can adjust for that clip, including Layout, Dimensions, and Rotation.
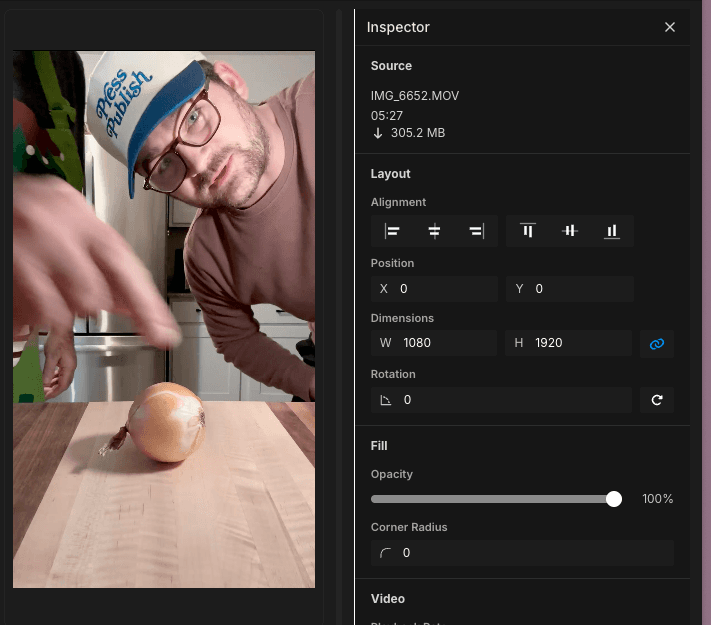
The Inspector provides both visual handles on the canvas and numeric inputs for precise control.
Resizing on Canvas
When you select a clip, you'll see handles appear around its edges on the canvas. These handles let you resize the clip visually:
Corner handles - Drag corner handles to resize proportionally. The clip maintains its aspect ratio, so you won't distort the image.
Edge handles - Drag edge handles to stretch or compress in one direction only. Use this when you want to change the aspect ratio.
Hold Shift while dragging to override the default behavior and unlock the aspect ratio.
Using the Dimensions Panel
For precise sizing, use the Width (W) and Height (H) inputs in the Inspector's Dimensions section. Enter exact pixel values to size your clip perfectly.
The linked chain icon between Width and Height controls whether the aspect ratio stays locked. When locked, changing one dimension automatically adjusts the other to maintain proportions.
Rotating Clips
Find the Rotation control in the Inspector panel. You can:
Enter a specific degree value (0-360)
Use the rotation handle on canvas to rotate visually
Click the 90-degree button to quickly rotate in increments
Common rotation uses:
Fix vertically shot phone footage (90 or 270 degrees)
Create dynamic angles for emphasis
Correct footage shot at a slight tilt
Match the orientation of multiple clips
Position Controls
The Position fields (X and Y) let you move clips to specific locations on screen. This works hand-in-hand with resizing:
Resize a clip smaller
Use position controls to place it in a corner
Create picture-in-picture or side-by-side layouts
Alignment Options
The Inspector's Alignment controls help you quickly position clips:
Left, center, or right alignment horizontally
Top, middle, or bottom alignment vertically
Perfect for consistent positioning across multiple clips
Common Resize and Rotation Scenarios
Zoom in on details - Make a clip larger to emphasize important moments like knife cuts or ingredient close-ups.
Create split screens - Resize two clips to half-width and position them side-by-side to show multiple angles.
Fix phone footage - Rotate vertical video 90 degrees and resize to fill the frame properly.
Emphasize text - Resize and position video clips to make room for text overlays or graphics.
Correct composition - Use position and size together to reframe shots and fix composition issues.
Tips for Better Results
Use the canvas handles for quick adjustments, the Inspector for precision
Keep aspect ratio locked unless you specifically need to stretch footage
Preview your changes by playing the video before moving to the next clip
Remember that all changes apply to the entire clip duration—use timeline splitting if you only want effects on part of a clip
